Introduction
Frontend JavaScript developers today have a great choice of tools available, that enable a more productive workflow. I currently facilitate Grunt, Bower and Yeoman, which are great build tools that emerged around the NodeJS community. I also use RequireJS for modularization and QUnit for unit testing.
I am always very hesitant in introducing new tools into my workflow, because there is often that period where you do not feel productive and the new tool is more in the way than helping. Very often though I can not imagine living without out that new tool after a while.
To help others to get their JS development faster to a more professional level I decided to write some quick tutorials covering one specific use case at a time, that I found useful for myself when working with the above mentioned tools. It will probably be geared mainly towards the intermediate and advanced JS developer, so total basics will not be covered.
Tutorial
This first post guides you to set up an example project with live reloading unit tests using Grunt and QUnit.
QUnit is the unit testing framework coming from the jQuery community.
Grunt is a task runner, that enables the automation of repetitive tasks.
Prerequisites
1. Download and Install NodeJS
NOTE: You do not need to use NodeJS for your project, but we will need NPM (The NodeJS package manager) to install and run Grunt.
2. Get the latest jquery.js
3. Get the latest qunit.js and qunit.css
OPTIONAL: If you are lazy you can just clone the project from a GitHub Repository I created for this tutorial:
git clone https://github.com/Sturmination/livereload_qunit_tut.git
Project Structure
/lib/jquery.js
/lib/qunit.js
/css/qunit.css

/src/tests.js
Gruntfile.js
package.json
index.html
File Contents
index.html
<!DOCTYPE html>
<html>
	<head>
		<title>Live Reloading Unit Test are awesome</title>
		<!-- Style -->
		<link href="css/qunit.css" rel="stylesheet" type="text/css" />
	</head>
	<body>
		<!-- Mark Up required by QUnit -->
		<div id="qunit"></div>
  		<div id="qunit-fixture"></div>

  		<!-- Libs -->
		<script src="lib/jquery.js" type=></script>
		<script src="lib/qunit.js"></script>
		<!-- Src -->
		<script src="src/tests.js"></script>
		<!-- LiveReload script served by Grunt -->
		<script src="http://localhost:35729/livereload.js"></script>

	</body>
</html>
The livereload.js is served by a localhost server. This is a NodeJS server opened by grunt later.
src/tests.js
test("This is just a test",function(){
	ok(true, "True is actually true!");
});
Just a very simple QUnit test. For further information see offical QUnit documentation.
Gruntfile.js
//Gruntfile
module.exports = function(grunt) {
  //Initializing the configuration object
  grunt.initConfig({
    watch: {
      // Folders and files that are being watched by grunt
      // Add your additonal project files and folders here!
      files: ["src/**/*.js", "index.html"],
      options: {
        livereload: true
      }
    }
  });

  // Plugin loading
  grunt.loadNpmTasks('grunt-contrib-watch');

  // Set watch as the default task
  grunt.registerTask('default', ['watch']);
};
This is the config file, which tells Grunt what to do. Remember adding your specific project folders and files to the watch task.
package.json
{
  "name": "livereload_tdd_tut",
  "version": "1.0.0",
  "description": "Example project on livereloading unit tests",
  "author": "Sebastian Metzger",
  "devDependencies": {
    "grunt": "~0.4.5",
    "grunt-contrib-watch": "~0.6.1"
  }
}
This file is required to tell NPM what dependencies to resolve for your project. We only need grunt and the grunt-contrib-watch task for this example.
Install Packages and Run Grunt
After you have set up your project directory, open a console and switch to that directory.
If you installed NodeJS correctly the following command should install the dependencies specified in the “package.json”
npm install
Now you can see NPM installing grunt in your project!
Next start grunt with the simple command
grunt
We configured in the “Gruntfile.js” the “watch” task as default, so no parameters are required.
If everything went right, the console now should say:
Watching...
This means the watch task is active! Grunt is monitoring your project folder for changes and has opened the NodeJS instance that serves the “livereload.js” file.
Finally open the index.html in the browser of your choice.
You should now see the QUnit interface and the single test successfully executed.
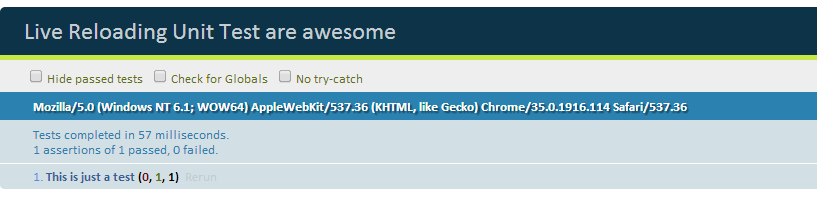
QUnit tests successful!
The “http://localhost:35729/livereload.js” included into your “index.html” should now have established a web socket connection to the server opened by the grunt watch task, which will trigger a page refresh, whenever the watch task detects a file change.
To test this just change anything in the “index.html” or “src/tests.js” and press the save button.
For example extend the “src/tests.js” with another test like this:
test("This is just a test",function(){
	ok(true, "True is actually true!");
});

test("This is just another test",function(){
	ok(true, "True is actually true!");
});
The browser window with the QUnit tests should now reload automatically after you save the file changes.
Isn’t this exciting? I think so! 🙂
Why is this useful?
Now you can basically put the browser with the unit tests on your second monitor and just hack away in your favorite IDE until you see something break in you peripheral vision. You do not have to break your coding workflow constantly to refresh the browser or click around in the user interface.
You can also open the tests in different browsers simultaneously, which all will reload after every change you make. This is very cool because you are constantly aware of cross browser compatibility and see a divergence exactly in the moment you wrote the line of code, that caused the faulty behavior.
I found this a useful workflow when working on a lower level library that does not directly affect any HTML/CSS or user interaction and thus can be better developed against unit tests from the start.
If anything is not working or you think I should go more or less into details in the next posts, please feel free and leave a comment. I also take requests for further tutorial posts. 🙂